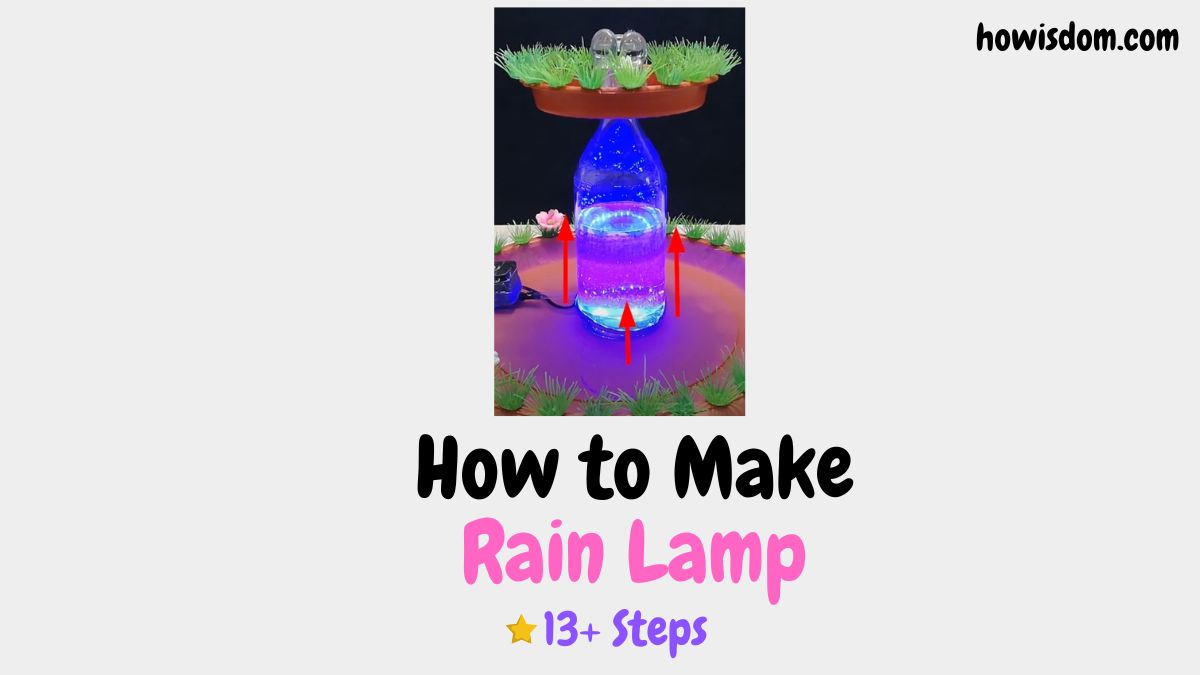
Below we have explained how to make a rain lamp. In this comprehensive guide, you can learn how to make a rain lamp. If you have a question, you can ask it in the comment section.
The oil rain lamp is another matter. But you can achieve this by adding oil to your regular rain lamp. After following the steps below and making your rain lamp, you can make an oil rain lamp by adding oil to the water.
Making Rain Lamp – Step by Step Guide
There are a few different ways that you can go about making a rain lamp. One way is to purchase a rain lamp kit.
These kits come with everything that you need to create the lamp, including the mineral oil, the water, and the base. Another way to make a rain lamp is to purchase a clear container, such as a fishbowl, and fill it with water.
Add a few drops of mineral oil to the water and place a small light inside the container. The light will reflect off of the water and create a beautiful effect.
Munite 30 minutes
1 Make a hole in the glass bottle.
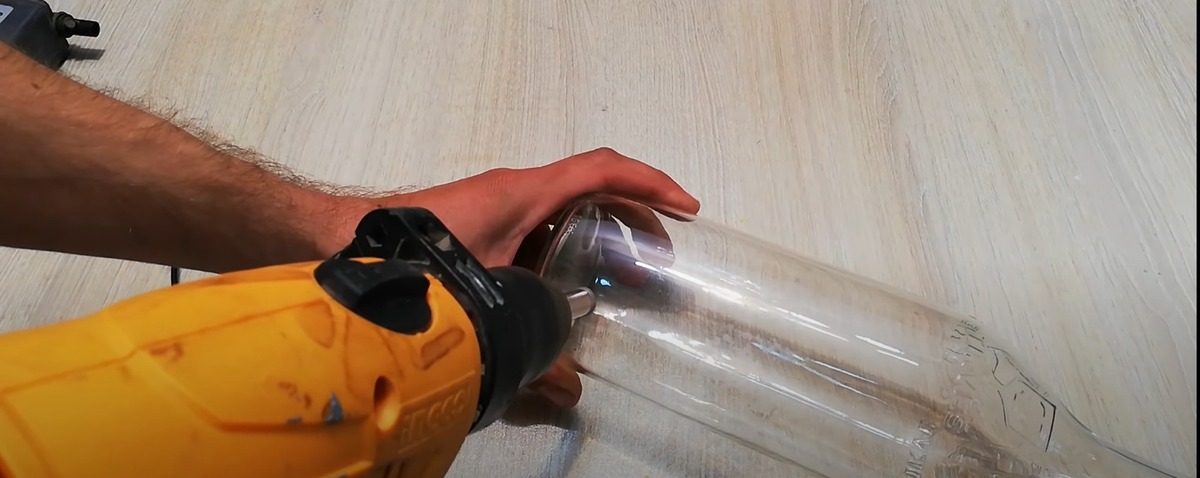
– Make two holes in the glass bottle with a powerful drill. We will use this hole to pass the power cable.
– Make One small plastic plate.
Water pump.
Plastic pipe.ure the holes are of equal size next to each other.
– You can wet the glass so as not to break it. Watch your hand.
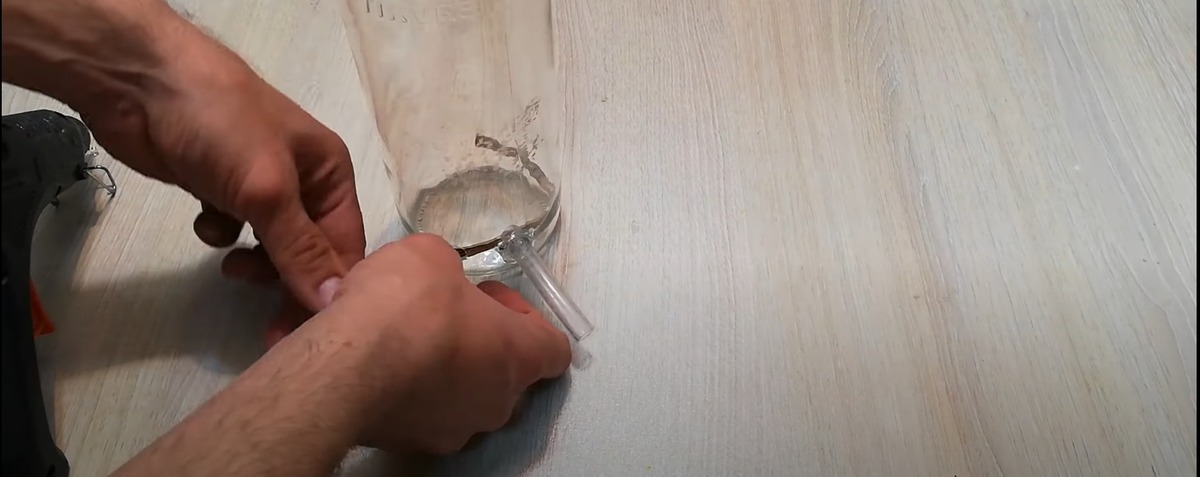
2 Thread a small hose into one of the holes.
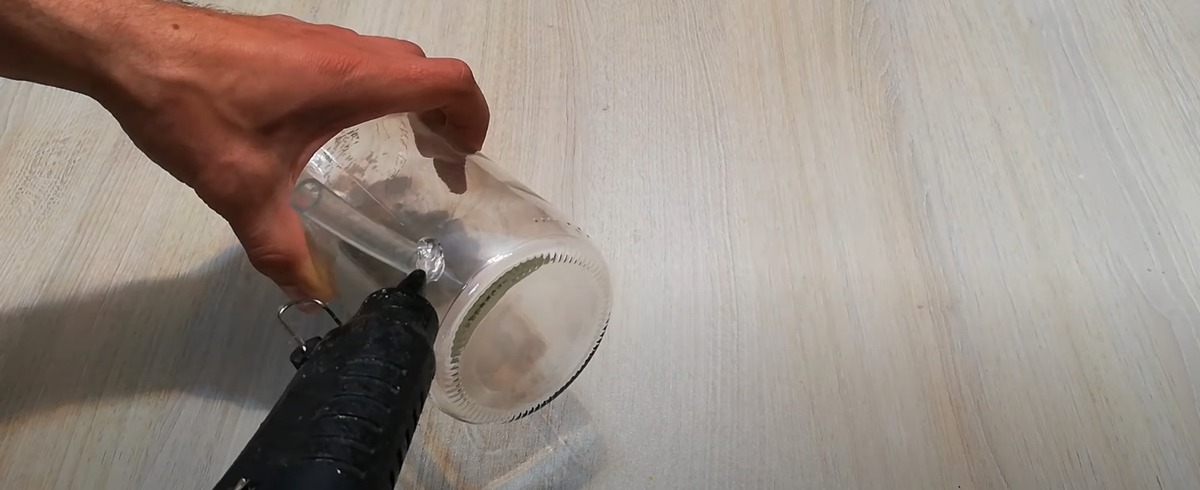
– Thread a small hose into one of the holes. Then stick it with a hot glue gun.
– Glue it well so that it does not leak water.
– Do not avoid using hot silicone abundantly.
3Pass the led light strip through the second hole.
– Pass the led light strip through the second hole and insert it into the bottom of the bottle.
– The led light strip should take the shape of the bottle. Adjust the size according to the volume of the bottle.
4Place the water pump at the bottom of the bottle.
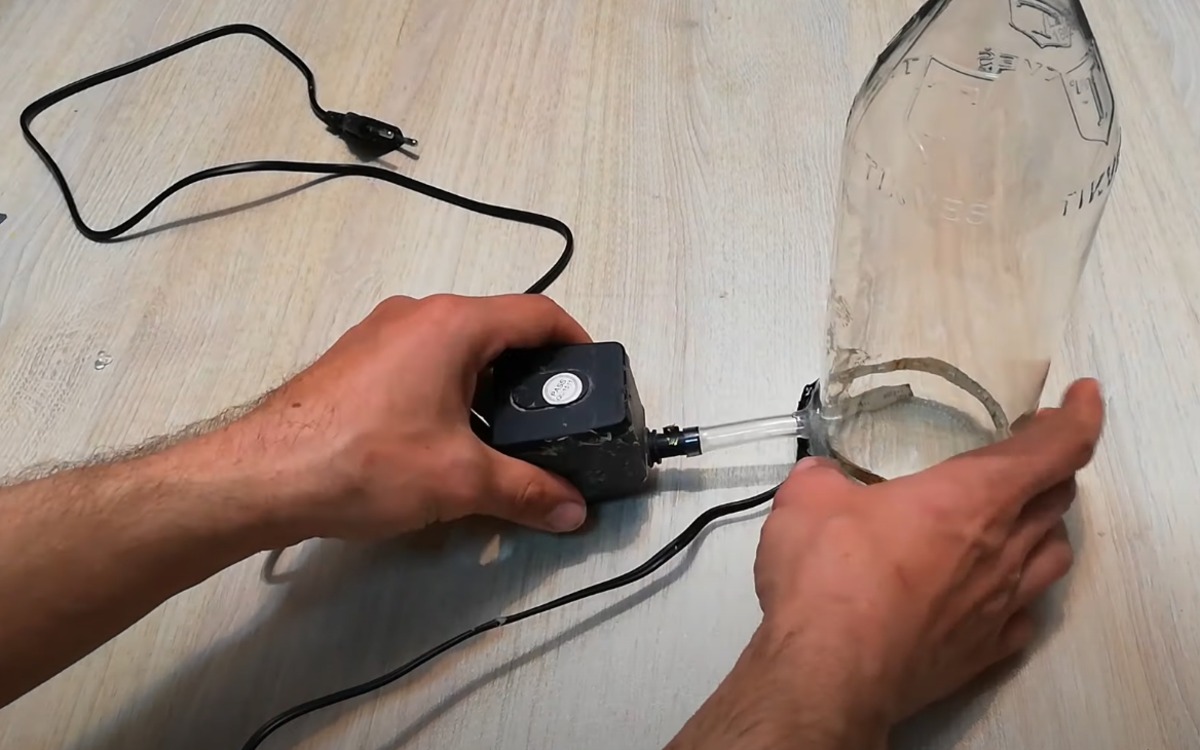
– We inserted a plastic pipe into the first hole we drilled.
– Attach the water pump to the end of this plastic tube.
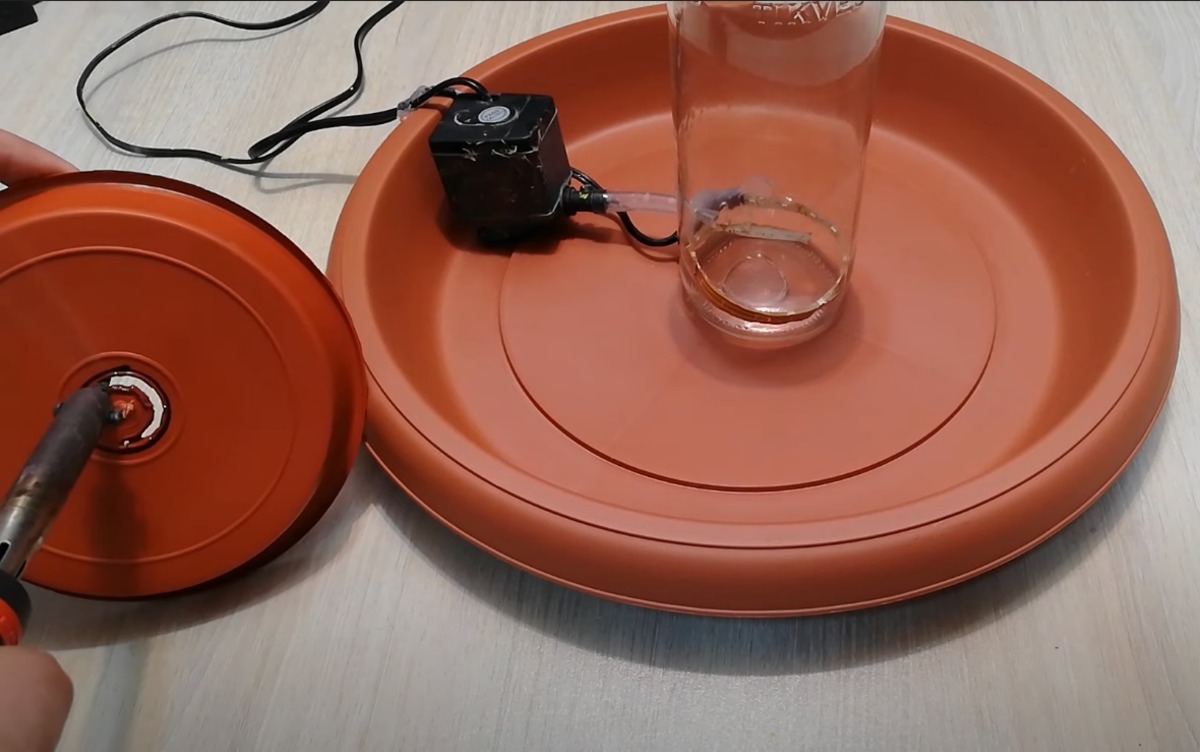
5Apply hot glue to the center of a round plate.
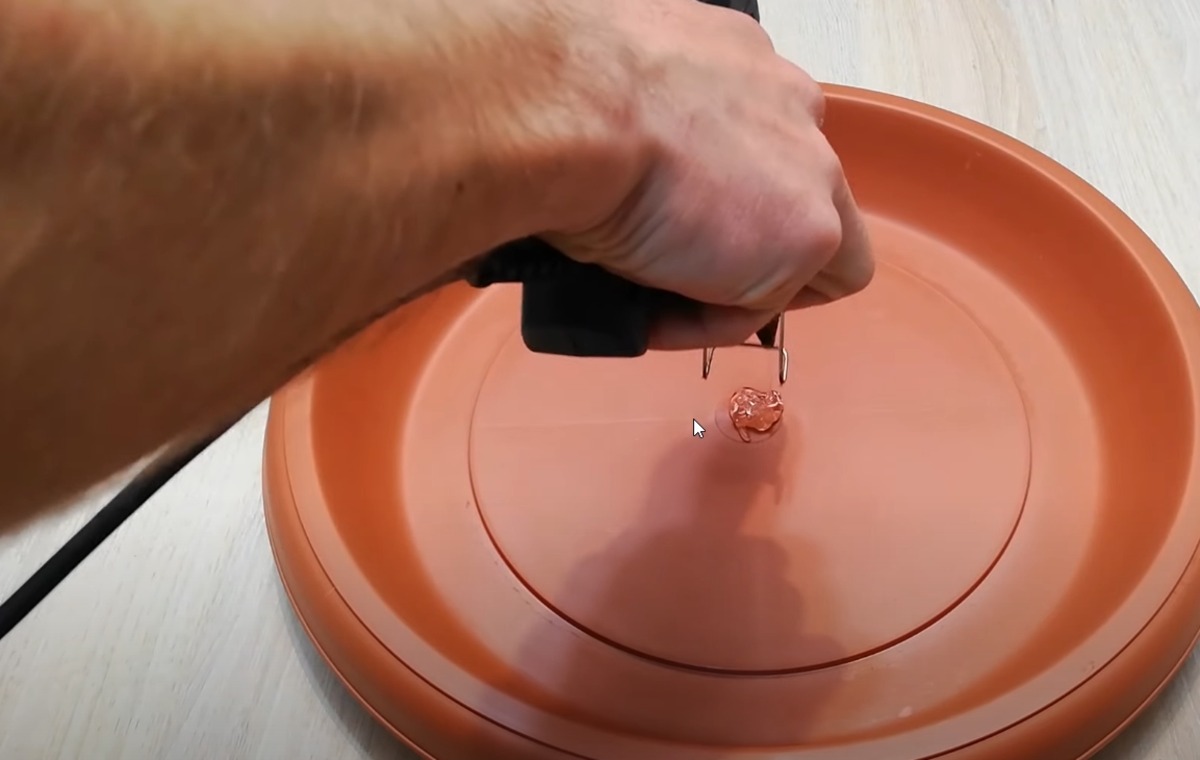
– You can use a pot plate. It will be easy to carry as it is plastic.
– Apply hot glue in the middle and go to the next step without waiting for it to dry.
6Fix the glass bottle right in the middle.
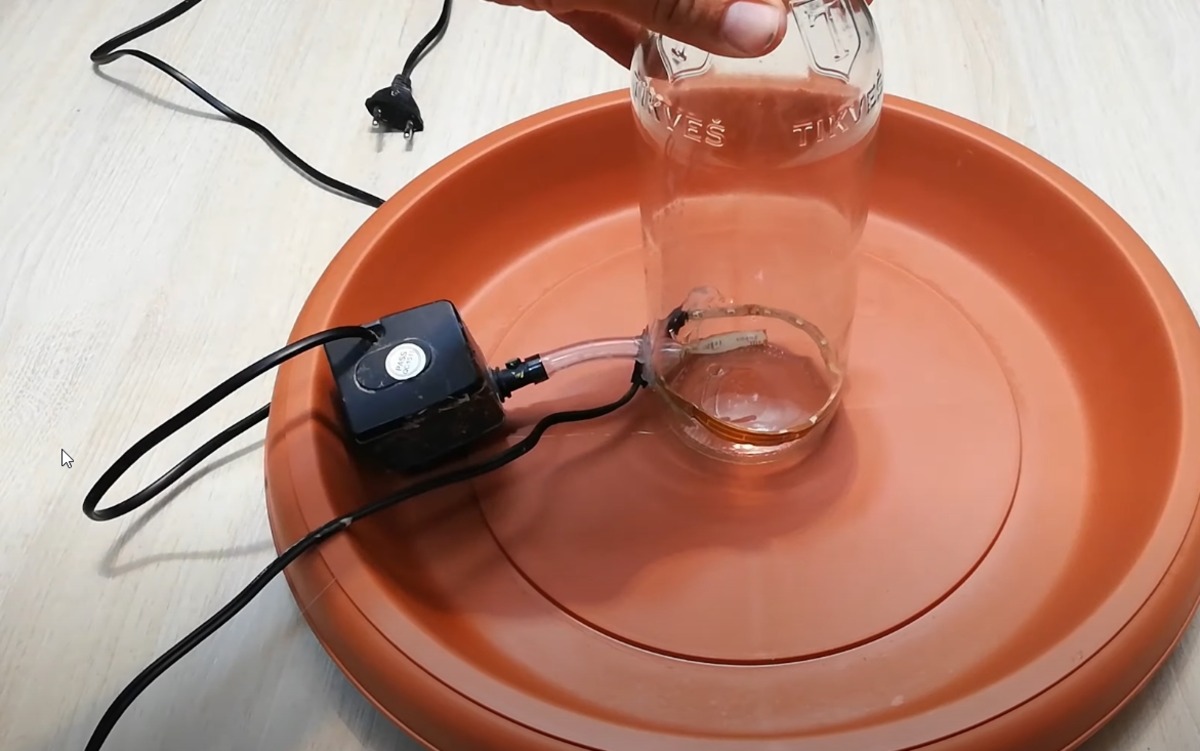
– Stick the glass bottle where we applied hot glue in the previous step.
– You can remove your hands without waiting for them to dry.
– Since the glass bottle is cold, the hot silicone cools immediately.
7Punch a hole in the center of a small round piece of plastic.
– You can also use a small pot base.
– If you have a soldering iron, you can melt the middle. Or you can make a hole with a small saw or knife.
8Check if the bottle fits in the mouth.
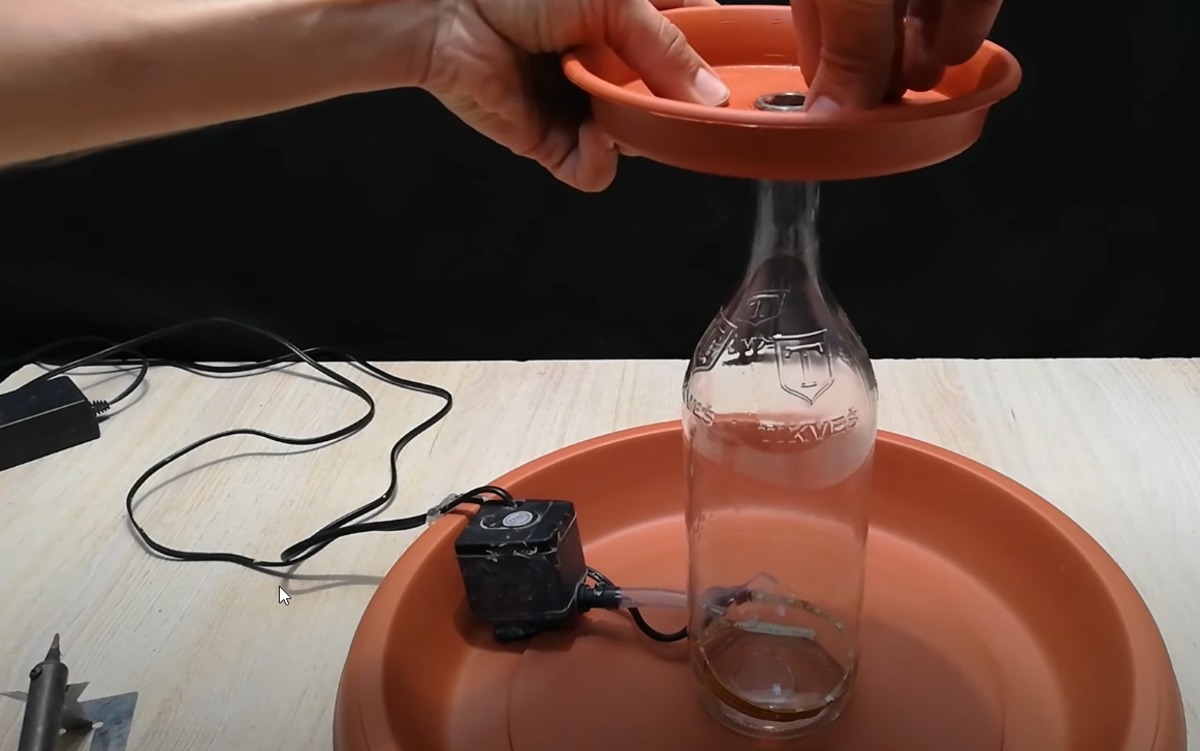
– Check that the hole in the plastic plate we drilled in the previous step fits the head of the bottle.
– In the next step, the bottle should be running smoothly through the center of the plastic plate.
9Make small holes in the sides of the small plastic plate.
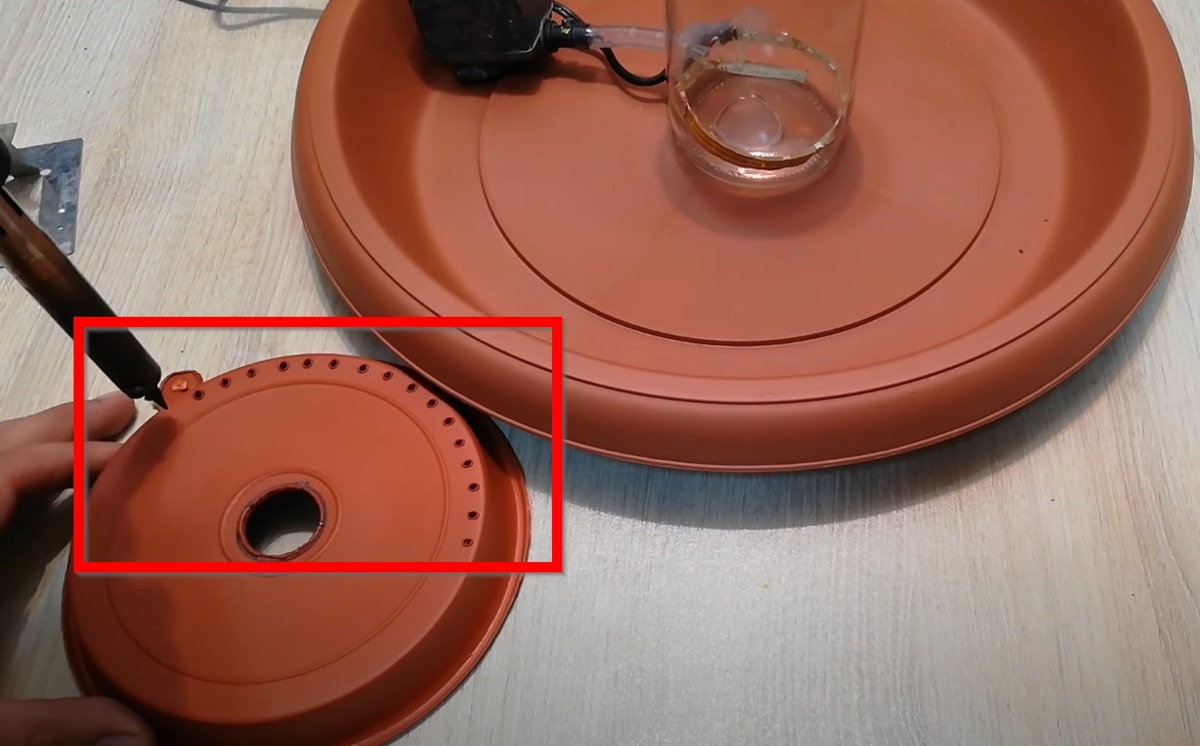
– After checking, drill small holes in the sides of the small plastic plate as in the picture.
– Water will flow from these holes. So it should neither be too big nor too small.
10Insert the plastic plate into the center of the bottle.

– Insert the plastic plate with which you drilled small holes in the center of the bottle.
– Fix it with hot glue.
11Glue small ornaments.
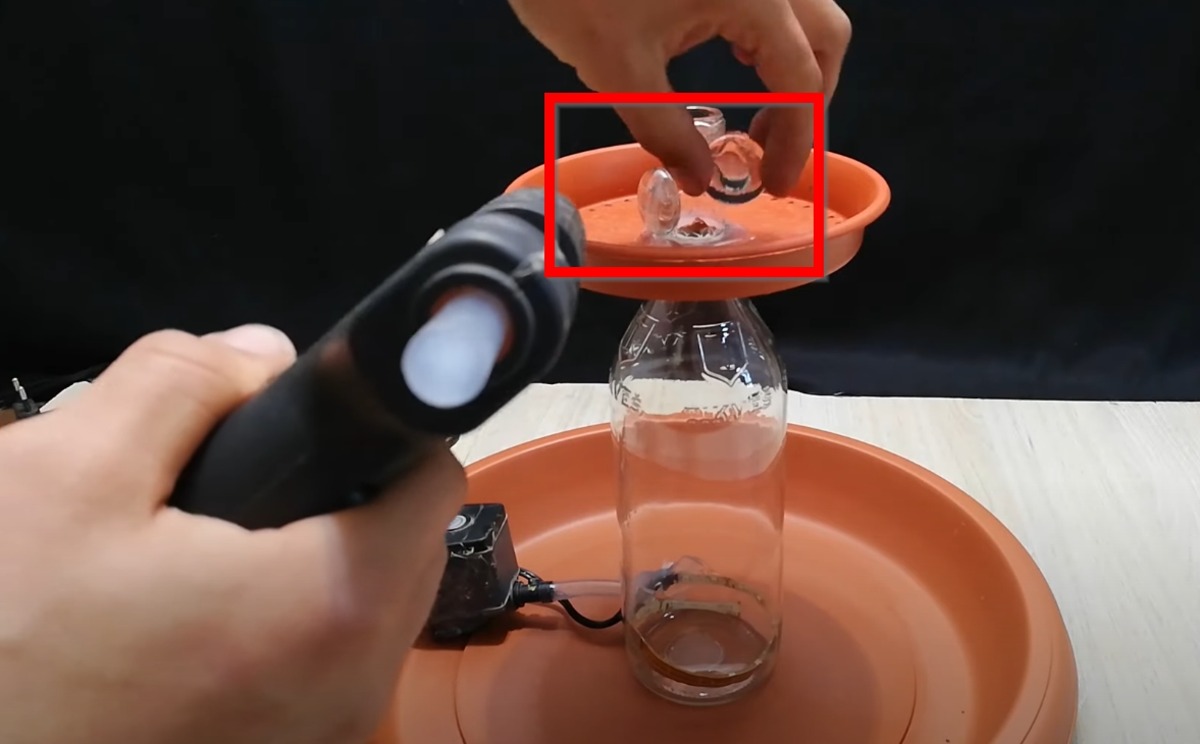
– Paste glass ornaments with light transmittance. Thus, it will have a better appearance.
12Put green grass ornaments.
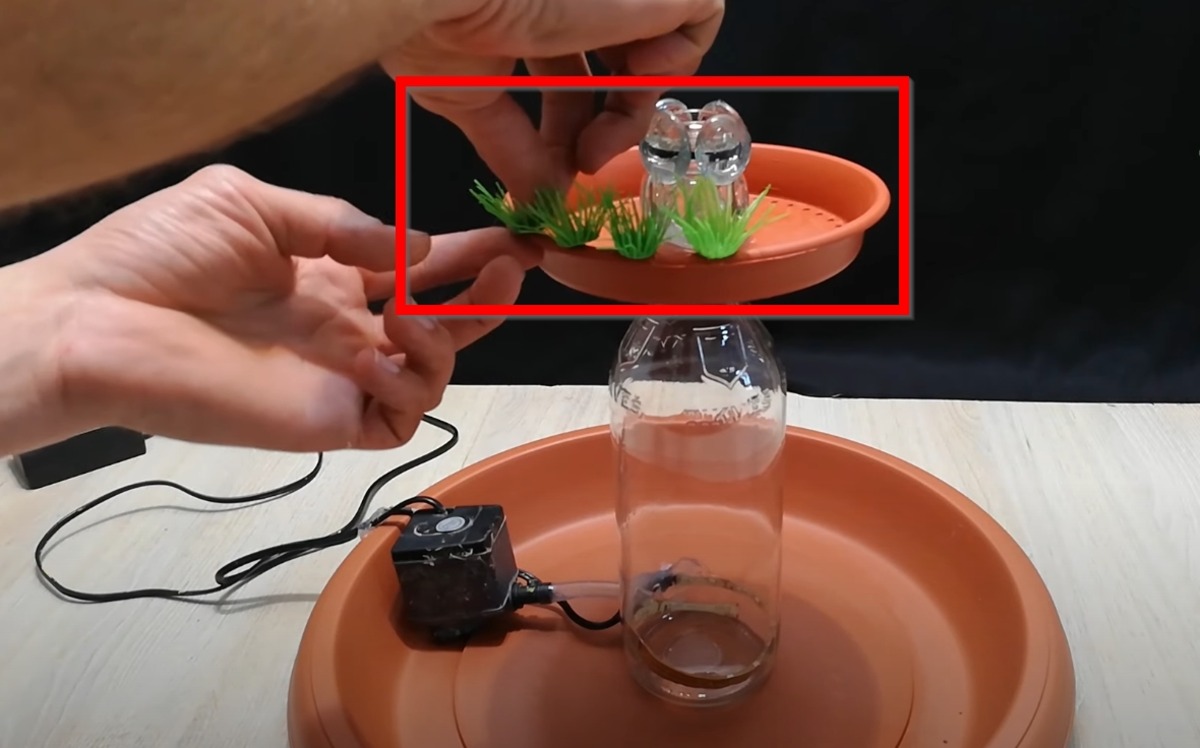
– Green colors evoke nature. That’s why you should put green ornaments.
13Fill the large plate with water.
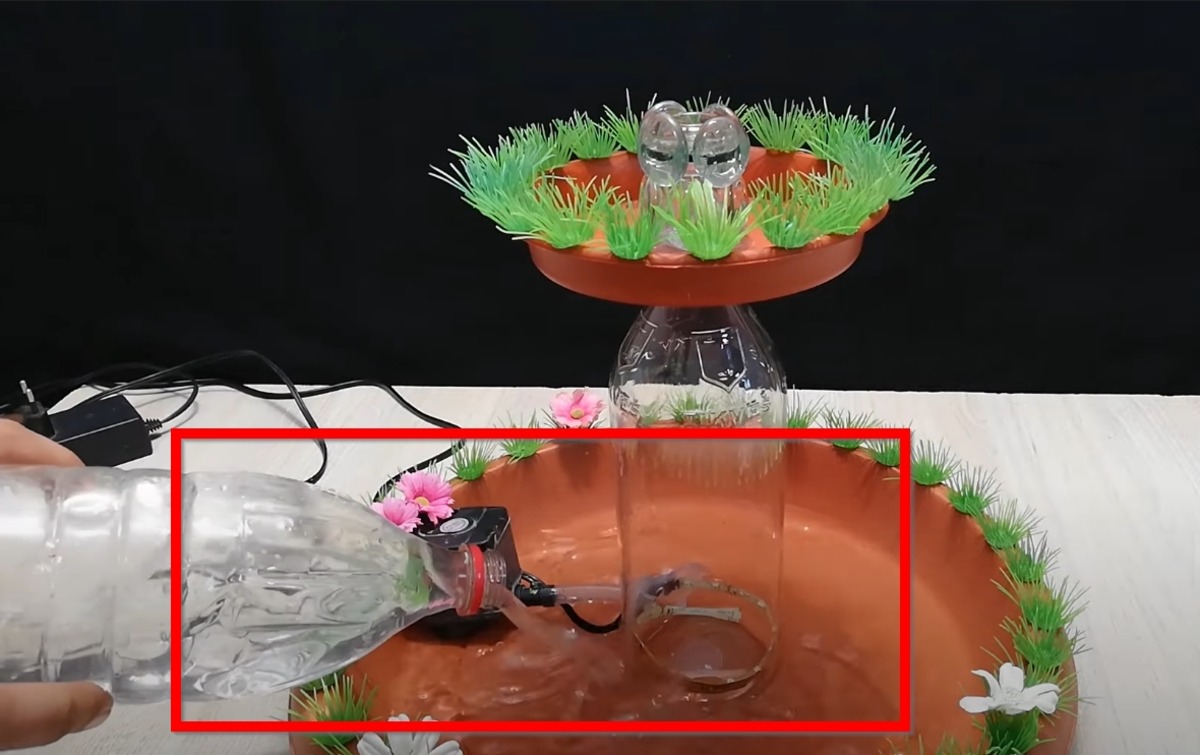
– Fill the plate halfway with water.
– Make sure the water is clear.Fill the plate halfway with water.
– Make sure the water is clear. So the rain effect will be more obvious.So the rain effect will be more obvious.
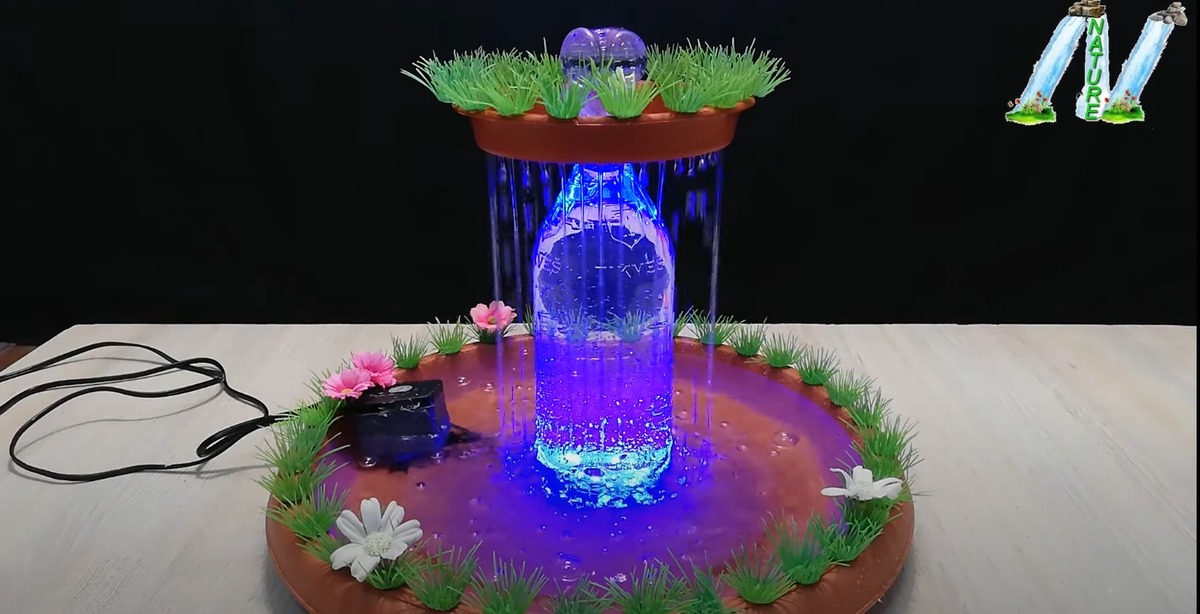
Rain Lamp with LED Light Outcome
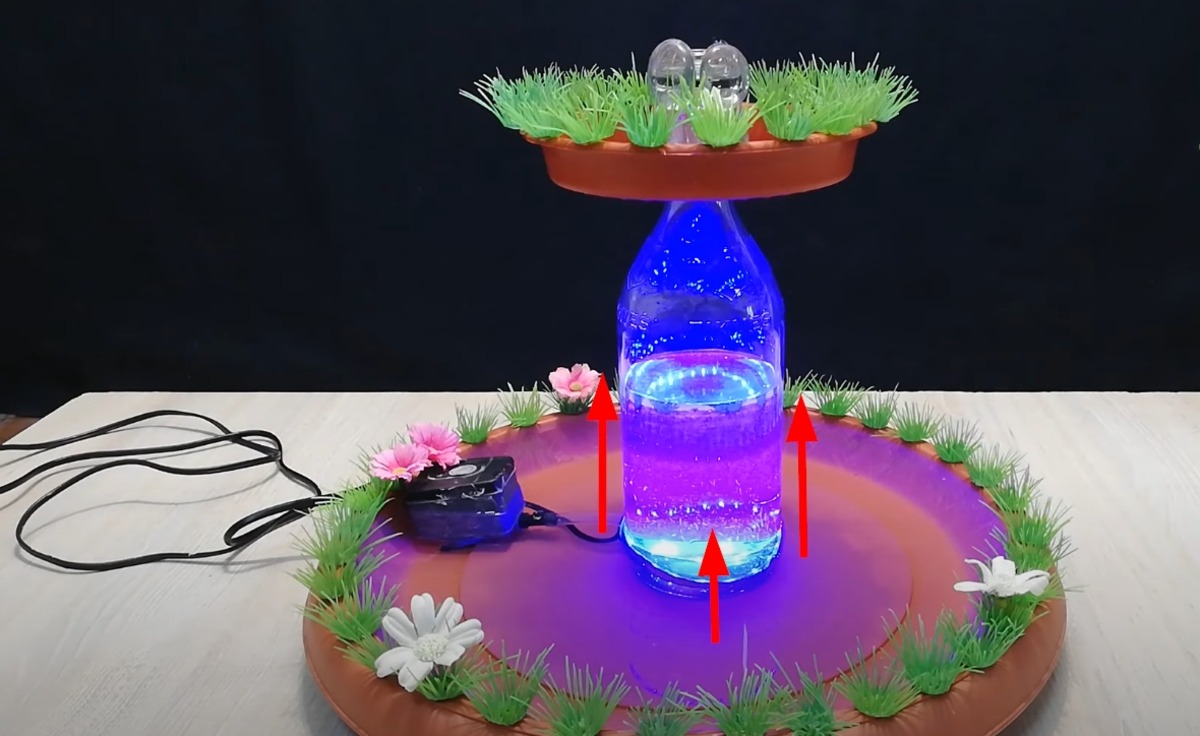
– Here you made a rain lamp. The rain lamp we made is with LED light.
– Rain lamps look beautiful at night. So place it in a dark place in your house.
– The rain lamp should be close enough to be plugged in.
Supply:
- Water
- Decorative ornament
Tools:
- Hot glue gun
- Drill
Materials: One large plastic plate One medium plastic plate One small plastic plate Water pump Plastic pipe
This guide’s images had taken by Nature.
Also check: Inside of a Blueberry / Color, Seed [Ultimate Guide]
What kind of oil goes in a rain lamp?
Since rain lamps are such unique and interesting pieces, you may be wondering what type of oil is best to use in yours. While there are a few different oils that can be used, we recommend using a light mineral oil.
How much mineral oil do you put in a rain lamp?
The thing is, there is no one-size-fits-all answer to this question. It depends on the size of the rain lamp, the type of oil you use, and your personal preferences.
How do rain lamps work?
Rain lamps work by using a metal frame to support a column of glass rods. These glass rods are filled with a clear liquid, typically mineral oil. The oil is lit from below by a small lightbulb, and as the oil heats up, it rises through the glass rods.
When did they stop making rain lamps?
Rain lamps were popular in the 1970s, but I don’t see them much anymore. I wonder why they stopped making them. Do you think they could make a comeback? I would love to have a rain lamp in my own home.